
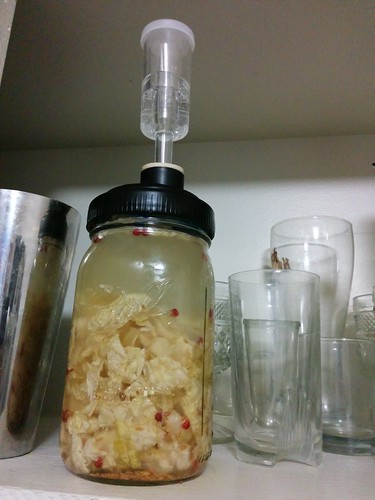
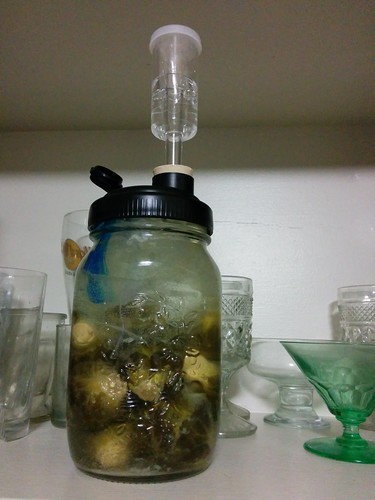
I’ve been fermenting a batch of cabbage to make sauerkraut, as well as a batch of Brussels sprouts to make (wait for it)… fermented Brussels sprouts. Yea, turns out there is not a special name for this delicacy.
It has been 3 weeks of fermentation for these jars, and we tasted them for the first time last night. I really liked the Brussels sprouts, they were getting soft and sour and everything I had hoped for. Doc didn’t like the Brussels sprouts, he liked the sauerkraut better. I thought the sauerkraut was OK, but not nearly as far along as I would like. It was only slightly sour and still very crunchy and salty. Over time, as the juices get pulled out of the plant tissues, the culture gets less salty-tasting and the plant tissues get less crunchy. So salty saurkraut is often a sign of not-finished sauerkraut. I’m reserving judgment on the saurkraut for a few more weeks.
Unlike homemade yogurt, where you pretty much have to add a starter culture (ie: mix in a little bit of already-made-yogurt into your milk), the process of fermenting vegetables feels way cooler because the lactic acid bacteria are commensurate with the vegetables, and are already hanging out on their surface. Waiting. All you do is make a super salty brine, plop your vegetables into the brine, and let the bacteria have at it for about four weeks (whenever you enjoy the taste, just move the jar to your fridge to slow/stop the fermentation – the longer the bacteria ferment, the more sour the vegetables will get).
The main purpose of the brine is to suck the juices out of the vegetable tissues via diffusion. Basically, the brine is way saltier than the inside of the cabbage cells, which are housed in semi permeable membranes, and so the liquids get sucked out through the membrane as the outside and inside approach an equal ion concentration. And then your bacteria buddies go to town. It also happens that many of the lactic acid bacteria are halotolerant (salt-tolerant), so the brine also gives you the added benefit of inhibiting the growth of many pathogens and other agents of spoilage, whilst not hurting the lactic acid bacteria. Note that the lactic acid bacteria are not usually halophilic (halophilic organisms need high salt to live), so it is possible to ferment things without a brine (consider, if you will, sour beers and yogurts which are not salty), but you would run a high risk of spoilage.
The lactic acid bacteria are non-respiring, which means that all they can do is ferment. Technically they are aerotolerant anaerobes, which means that oxygen does not kill them or harm them, but they don’t use the oxygen in any way. They don’t even notice the oxygen (or lack thereof). Since fermentation yields a lot less energy than respiration (which doesn’t always require oxygen, but let’s assume for simplicity’s sake that it does; especially since we are not likely to have loads of metals in our brine), fermenters can easily get out-competed in aerobic environments by oxygen respirers.
So, to give my bacterial buddies a leg up on the competition, I sealed off the jars and put a vent system in with a water trap. Fermentation produces CO2, you see, and I didn’t want the jars to build up pressure to the point of explosion. I want to eat the sauerkraut, not blow up my kitchen with it. With this set-up, CO2 can leave through the vent, but no new oxygen can get in. This means, once the undesirable aerobic bacteria use up the tiny bit of oxygen left in the jar, they won’t be able to do anything else. They’d have to either switch to fermentation themselves (in the case of facultative anaerobes – bacteria that will use oxygen if present but will switch to fermentation in its absence), or sporulate to wait around for more oxygen, or just die. And there will be no more respiration out-competing fermentation.
Lactic acid bacteria are a diverse bunch, spanning several genera and many of the species do slightly different things. They all ferment the sugars from the vegetable tissues, but some only make lactic acid, while other species might make other compounds in addition to lactic acid. You can even get esters and other weird things produced if you let the culture go on long enough, which can really contribute to a unique flavor.
Supposedly the most common player in fermented vegetables is Lactobacillus plantarum, but I will attempt to identify the bacteria I have growing in my fermentation jars. Will they be monocultures? Will they be mind-bogglingly diverse? Will the Brussels sprouts have a completely different community compared to the cabbage? Obviously, different strains will be dominant at different stages in the fermentation.
Stay tuned! I will share all of my results, and even some super awesome photos of the bacteria growing in my fermentation jars – taken with a microscope. Will they be coccoid? Bacilloid? Spirilloid? Probably not spirilloid, but still. WILL THEY BE ALL OF THE ABOVE? How will you handle the suspense?
hi steen
thank u for all of this valuable information , i really like it very well specially the water trap , so if please if u can tell me how to make this trap or how it work cause i want to do it in my home pickles
thank u very much
No problem, I’m glad you found the post informative!
I bought my water traps from FARMcurious: http://www.farmcurious.com/product/recap-fermenting-set/, and there are also some available here: http://www.gardeners.com/buy/small-batch-fermentation-kit/8589398.html and here: http://www.williams-sonoma.com/products/1325117/?catalogId=68&sku=1325117
but I imagine you could totally make your own if you were so inclined. What the water trap includes is: a tube that allows the gas to escape, a larger container that this tube feeds into (that you pour the water into), and a very loose “cap” to place over the tube, inside the larger outer container, which keeps the water from entering the tube. It needs to be loose because when the gas gets produced, it gets pushed up and then the gas bubbles through the water. The water is to keep any gas from getting into the jar, but bubbles can escape outwards through the water.
Hopefully this has clarified things!